1. Create a New Android Project
Step 1
In Eclipse, create a new Android project. Enter your chosen application, project, and package names. Let Eclipse create a blank activity for you, with the name of your choice for both the activity and its layout.

Step 2
Open your main layout file. With the default settings, Eclipse starts your layout with aRelative Layout object, which you can leave as is. Inside of it, replace the existing content (typically a Text View) with a button.
01
02
03
04
05
06
07
08
09
10
| android:layout_width="match_parent" android:layout_height="match_parent" > <Button android:id="@+id/scan_button" android:layout_width="wrap_content" android:layout_height="wrap_content" android:layout_centerHorizontal="true" android:text="@string/scan" /></RelativeLayout> |
After the button, add two Text Views in which we will output scanning information.
01
02
03
04
05
06
07
08
09
10
11
12
13
14
| <TextView android:id="@+id/scan_format" android:layout_width="wrap_content" android:layout_height="wrap_content" android:textIsSelectable="true" android:layout_centerHorizontal="true" android:layout_below="@id/scan_button" /><TextView android:id="@+id/scan_content" android:layout_width="wrap_content" android:layout_height="wrap_content" android:textIsSelectable="true" android:layout_centerHorizontal="true" android:layout_below="@id/scan_format" /> |
Add the button text string to your "res/values/strings" XML file.
1
| <string name="scan">Scan</string> |
The user will press the button to scan. When the app receives a result from the barcode scanning operation, it will display the scan content data and format name in the two Text Views.
2. Add ZXing to Your Project
Step 1
ZXing is an open source library that provides access to tested and functional barcode scanning on Android. Many users will already have the app installed on their devices, so you can simply launch the scanning Intents and retrieve the results. In this tutorial we are going to use the Scanning via Intent method to make scanning easier. This method involves importing a couple of classes into your app and lets ZXing take care of instances where the user does not have the scanner installed. If the user doesn't have the barcode scanner installed, they'll be prompted to download it.
Tip: Since ZXing is open source, you can import the source code into your projects in its entirety. However, this is really only advisable if you need to make changes to its functionality. You can also compile the project and include its JAR file in your own apps if you prefer. For most purposes, using Scanning via Intent is a reliable and easy to implement options, plus your users will have access to the most recent version of the ZXing app.
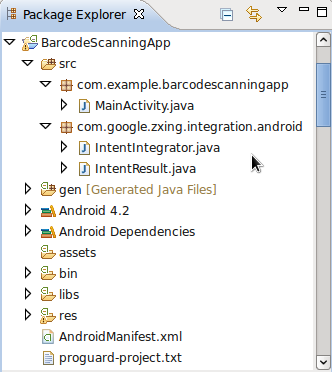
In Eclipse, add a new package to your project by right-clicking the "src" folder and choosing "New", then "Package", and entering "com.google.zxing.integration.android" as the package name.

Step 2
Eclipse offers several ways to import existing code into your projects. For the purposes of this tutorial, you'll probably find it easiest to simply create the two required classes and copy the code from ZXing. Right-click your new package, choose "New" then "Class" and enter "IntentIntegrator" as the class name. You can leave the other default settings the way they are. Once you've created this class, do the same for the other class we'll be importing, giving it "IntentResult" as its class name.

Copy the code from both classes in the ZXing library and paste it into the class files you created. These are IntentIntegrator and IntentResult. Refer to the source code download if you're in any doubt about where the various files and folders should be or what should be in them.
You can now import the ZXing classes into your main Activity class.
1
2
| import com.google.zxing.integration.android.IntentIntegrator;import com.google.zxing.integration.android.IntentResult; |
Go ahead and add the other import statements we'll use for this tutorial. Bear in mind that Eclipse may have already added some for you.
1
2
3
4
5
6
7
8
| import android.os.Bundle;import android.app.Activity;import android.content.Intent;import android.view.View;import android.view.View.OnClickListener;import android.widget.Button;import android.widget.TextView;import android.widget.Toast; |
Feel free to have a look at the content of the two ZXing classes. It's fairly straightforward, but the details of the barcode scanning processing are carried out elsewhere in the library. These two classes really act as an interface to the scanning functionality.
3. Do Some Scanning
Step 1
Let's implement scanning when the user clicks the button we added. In your app's main activity class, the default onCreate method entered by Eclipse should look something like this.
1
2
3
4
| protected void onCreate(Bundle savedInstanceState) { super.onCreate(savedInstanceState); setContentView(R.layout.activity_main);} |
Above this method, add the following instance variables to represent the button and two Text Views we created in the layout file.
1
2
| private Button scanBtn;private TextView formatTxt, contentTxt; |
In onCreate, after the existing code, instantiate these variables using the ID values we specified in the XML.
1
2
3
| scanBtn = (Button)findViewById(R.id.scan_button);formatTxt = (TextView)findViewById(R.id.scan_format);contentTxt = (TextView)findViewById(R.id.scan_content); |
Next, add a listener to the button so that we can handle presses.
1
| scanBtn.setOnClickListener(this); |
Extend the opening line of the class declaration to implement the OnClickListenerinterface.
1
| public class MainActivity extends Activity implements OnClickListener |
Step 2
Now we can respond to button clicks by starting the scanning process. Add anonClick method to your activity class.
1
2
3
| public void onClick(View v){//respond to clicks} |
Check whether the scanning button has been pressed inside this method.
1
2
3
| if(v.getId()==R.id.scan_button){//scan} |
Inside this conditional block, create an instance of the Intent Integrator class we imported.
1
| IntentIntegrator scanIntegrator = new IntentIntegrator(this); |
Now we can call on the Intent Integrator method to start scanning.
1
| scanIntegrator.initiateScan(); |
At this point, the scanner will start if it's installed on the user's device. If not, they'll be prompted to download it. The results of the scan will be returned to the main activitywhere scanning was initiated, so we'll be able to retrieve it in the onActivityResultmethod.
Tip: When you call the initiateScan method, you can choose to pass a collection of the barcode types you want to scan. By default, the method will scan for all supported types. These include UPC-A, UPC-E, EAN-8, EAN-13, QR Code, RSS-14, RSS Expanded, Data Matrix, Aztec, PDF 417, Codabar, ITF, Codes 39, 93, and 128. The ZXing library also includes barcode scanning options that we're not going to cover in this tutorial. You can check the project out at Google Code for more info.
4. Retrieve Scanning Results
Step 1
When the user clicks the scan button, the barcode scanner will launch. When they scan a barcode, it will return the scanned data to the onActivityResult method of the calling activity. Add the method to your main activity class.
1
2
3
| public void onActivityResult(int requestCode, int resultCode, Intent intent) {//retrieve scan result} |
Inside the method, try to parse the result into an instance of the ZXing Intent Result class we imported.
1
| IntentResult scanningResult = IntentIntegrator.parseActivityResult(requestCode, resultCode, intent); |
Step 2
As with any data being retrieved from another app, it's vital to check for null values. Only proceed if we have a valid result.
1
2
3
| if (scanningResult != null) {//we have a result} |
If scan data is not received (for example, if the user cancels the scan by pressing the back button), we can simply output a message.
1
2
3
4
5
| else{ Toast toast = Toast.makeText(getApplicationContext(), "No scan data received!", Toast.LENGTH_SHORT); toast.show();} |
Back in the if block, let's find out what data the scan returned. The Intent Resultobject provides methods to retrieve the content of the scan and the format of the data returned from it. Retrieve the content as a string value.
1
| String scanContent = scanningResult.getContents(); |
Retrieve the format name, also as a string.
1
| String scanFormat = scanningResult.getFormatName(); |
Step 3
Now your program has the format and content of the scanned data, so you can do whatever you want with it. For the purpose of this tutorial, we'll just write the values to the Text Views in our layout.
1
2
| formatTxt.setText("FORMAT: " + scanFormat);contentTxt.setText("CONTENT: " + scanContent); |
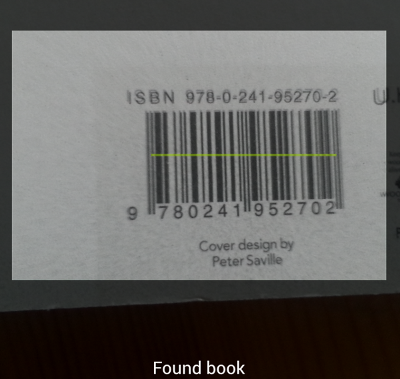
Run your app on a device instead of an emulator so that you can see the scan functioning. Try scanning a book or any other barcode you might have.
Fuente : http://code.tutsplus.com/tutorials/android-sdk-create-a-barcode-reader--mobile-17162
No hay comentarios:
Publicar un comentario